 |
| How to Install And Configure OpenCV with Visual Studio |
- Windows 10 64-bit
- Visual Studio Community Edition 2015 Update 1
- OpenCv 3.1.0
- Download and install Visual Studio 2015 Community Edition. It's free and choosing all default option including VC++ will work fine.
- Download latest version of OpenCV. I am using OpenCV 3.1.0
- Make a folder of your OpenCV version. for example "C:\OpenCV-3.1.0"
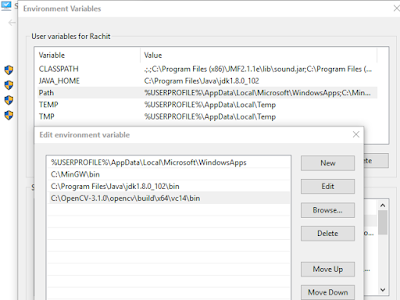
- Add the bin directory of OpenCV to the operating system path.
a) Go to: System Properties -> Advanced Sytem Settings -> Environment Variables -> Edit Path Variable
b) Add new path value to "C:\OpenCV-3.1.0\opencv\build\x64\vc14\bin" and Apply Changes. - Start Visual Studio, choose File->New->Project
- Choose Visual C++, Empty Project, name your project, example "Test", Set preferred location, uncheck "Create directory for solution" and "Add to source control", Choose Ok.
- Right Click in Solution Explorer,Choose Add -> New Item. Choose "C++ File", name the file, example "ObjectTracking.cpp". Choose Add.
- In the Visual Studio toolbar, verify that "Solution Configurations" is set to "Debug", then change "Solution Platforms" to "x64"
- In VS 2015 go to:
a) Project -> (project name) Properties -> Configuration Properties -> VC++ Directories -> Include Directories add the include directory for your version of OpenCV, ex "C:\OpenCV-3.1.0\opencv\build\include"
b) Project -> Properties -> Configuration Properties -> VC++ Directories -> Library Directories: add the library directory for your version of OpenCV, ex "C:\OpenCV-3.1.0\opencv\build\x64\vc14\lib"
c) Project -> Properties -> Configuration Properties -> Linker -> Input -> Additional Dependencies: Copy/paste the name of the debug lib(s) in the lib directory, ex "opencv_world310d.lib" - Done ! You are ready to write code and Run your program.
Like, Share and Comment Below


Getting error unable to create empty project in VS 2015 Community Update 3. I reinstalled it but still got the same error. 'Project type .vcxproj is not supported by this version of the application'. Help me Please ?
ReplyDeleteUninstall Visual Studio 2015 Update 3 and Try Installing Visual Studio 2015 Update 1 .iso Installer
DeleteThanks Bro.. Finally Worked :)
DeleteHi,
ReplyDeleteI follow all your steps, but when I try to execute a program in order to test opencv functionalities, the debug quit the execution with an error : debug error, abort () has been called
thank you so much.. work like a charm :)
ReplyDeleteI tried running cannystill on visual studio but brings an error "LNK1104"
ReplyDeleteWhat sould I do
This is a very helpful guide for setting up OpenCV.
ReplyDelete